Installation Guidelines
The following guide is to provide information for residential Shade Sails and how they work. If your shade sails will be over 100 sq. metres or 1000 sq. feet it should be done by a professional. There are many variables and it is not recommended as a Do-It-Yourself project. Those who choose to try we urge you to contact us during your design process and prior to starting any work. We are always happy to answer any questions and help you through the process to get the installation right.
Shade sails are a tensioned system consisting of 3 essential elements. They are: solid anchor points, a properly made sail, and correct installation and tensioning.
Shade sails are a versatile product that can be installed almost anywhere in limitless ways. Shade Sails are tensioned so attachment points must be solid structures able to take the load. Varied combinations can be utilized to attach your sail such as existing buildings and trees. Make sure that these points are a part of a solid foundation; enough to support the load exerted by high winds. If additional points are required metal or wood posts can be installed. Proper planning and following the guidelines will ensure a strong stable sail that will endure extreme winds your sail will perform the way it is intended and last for many, many years.
Design and Layout
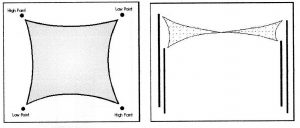
Shade Sails can be installed in a variety of ways but they must be installed properly to ensure stability. Shade Sails must be installed with a 15 degree slope, usually a difference of at least 3 feet between one or more attaching points and depending on the size of the sail, more. A twist, see Fig. a and b, some corners high and some corners low; creates stability and style.
Here are a few things to consider when determining the best placement of your sail
-
Because shade sails are tensioned structures the sails will be approximately 10% smaller than the area outlined by the anchor points to allow for stretch and hardware to tension the sail. They also have a slight inward curve on the edges for tension. It is recommended you make your sail 2 to 3 feet larger than the area to be shaded.
-
Determine area to be shaded taking into account position of the sun when you will need shade the most. Keep in mind the shaded area will move with the sun’s movement. String can be attached to the projected anchor points temporarily to help visualize the footprint of your sail. Leave the string for a couple of days and watch the shadow to see where the shade will fall
-
Shape and number of shade sails
-
Strength of existing anchor points
-
Call-Before-You-Dig to locate utilities if additional posts are required. This service is free in most places. Be aware of position of overhead wires as well.
-
Barbeques and fire pits should not be positioned under the sails.
Anchor Points
Anchor points must be established before measuring in order to determine the correct size of the shade sail. Anchoring points can be a variety of existing structures such as houses, garages, pergolas, and trees that have a solid foundation. Where there are no existing points to attach to, a post can be installed.
Steel posts are recommended, minimum 4 inch are used. Poles should not be higher than 12 feet at this size. Drill the holes for the eye bolts before the pole is installed in the ground. Galvanized steel is best. Aluminum is too soft to take the load. If you wish to use pressure treated posts, 6” x 8” are recommended.
Posts must be set in concrete; with a strength of 25MPa. The footing depth needs to be 4 to 4.5 feet deep. Dig a hole 15”-16”. These dimensions are necessary, the amount of concrete is part of the whole system. Place post in hole; it is recommended to lean the post 5 degrees away from the centre and can be up to 25 degrees, however if there is more than 1 sail attached to a post it must be set straight. Fill with concrete. Finish with concrete sloping away from pole.
Using eye bolts, eye screws or eye plates attach the anchor hardware to the anchor point locations. Pre-drill metal posts before they are set in the hole. Make sure all connections are attached in solid points such as joist or studs and are tightly secured. We recommend using no less than 3/8 inch sizes for attaching hardware.
Posts
Posts must be a minimum 6”x 6” if using pressure treated wood posts. 6” x 8” are recommended especially for posts 10’ to 12’ in height. Galvanized steel minimum 4” round or square is best; if plain steel is used the posts must be painted to inhibit rust. Aluminum is not recommended. Post should not be taller than 12 feet. If more height is desired you need much larger posts and you should check with a professional. If using metal posts it is recommended drilling holes (3/8”) for the eye bolts before setting the pole in the concrete. Posts must be set in concrete. The footing depth must be equal to ½ the height of the exposed post. Dig a hole 14”-16” in diameter in firm undisturbed ground. Insert a bolt or rod near bottom of round metal post to anchor and keep from twisting. Place post in hole; it is recommended to lean the post 5 degrees away from the centre and can be up to 25 degrees, however if there is more than 1 sail attached to a post it must be straight. Fill with concrete. Finish with concrete sloping away from pole. Temporarily brace the post and allow 48 hours to set before taking measurements.
Measuring or the Shade Sail
Precise measurements are very important. We custom make your shade sail to fit your unique space. .This guarantees a stable sail. All anchor points should be established and all the necessary hardware installed to your attaching points before this next step. Using a flexible tape measure, you can now take the measurements for the shade sail. Take measurements from anchor point to anchor point pulling the tape measure tight, working your way around the perimeter. If your shade sail has four sides or more, measurements from points diagonally opposite are needed to achieve correct angles.
Mounting the Sail
Your shade sail has arrived and now you’re ready to install it:
-
Choosing the appropriate hardware for installing your shade sail is essential. Your Ray Catcher Sun Sail has stainless steel loops sewn into each corner. Shade sails are tensioned canopies, so turnbuckles must be used on at least 2 corners. Additional hardware required to install your shade sail can be purchased through us or in purchased in hardware or fastener stores. You should use galvanized steel or if you live near salt water, stainless steel, because these metals won’t rust easily and will have longer life.
-
Use closed style hardware as open eyelets may allow the sail to become detached in strong winds. 3/8-inch turnbuckles, quick links, or d-shackles are recommended.
-
For smaller shade sails at least two adjacent corners of the sail should be attached with turnbuckles used to tension the sail. It is best if all corners of larger sails have tensioners.
-
To attach and tension your shade sail properly follow the installation instructions provided with your sail. Do not over tighten.
-
The shade sail must be taken down when snow conditions exist.
Care and Maintenance
Your shade sails must be cleaned over time. When cleaning use mild soap with a low pressure water hose and a soft scrubbing brush. Do not use bleach or other chemicals on your sail. Air dry only; never apply heat to the shade cloth. Do not pressure wash.
Liability
If these steps are not followed as outlined above, Ray Catchers Sun Sails can not be held liable for the defects caused by incorrect installation and warranty of the sail materials is void. Furthermore, Ray Catchers Sun Sails can not be held liable for any defects in the installation material that has been provided by or purchased by the customer.